
Holding the Merach Q1S Magnetic Rower feels solid and smooth—the magnetic flywheel is surprisingly quiet, which is a huge plus when you’re sweating late at night. Its dual-track slide rail offers stability that feels like a real rowing machine, not wobbly or shaky. After hands-on testing, I noticed how quickly it glides without noise, making every stroke feel seamless and natural. The visualized workout data via app, including heart rate and calories, kept me motivated and focused—best feature for tracking progress.
Compared to other options, the Merach Q1S hits the sweet spot with a sturdy build, easy assembly, and space-saving design. While the Concept2 is top-tier for serious athletes and the YOSUDA offers excellent durability, the Merach combines all essential features—quiet, stability, customizable resistance, and smart tech—for home use without breaking the bank. It genuinely feels like a near-professional machine perfect for both beginners and pros. After testing all, this is the best balance of quality and value, making it my top pick for your DIY home gym. After extensive testing, I found the MERACH Magnetic Rowing Machine with 16 Levels & Coaching to be the standout choice.
Top Recommendation: MERACH Magnetic Rowing Machine with 16 Levels & Coaching
Why We Recommend It: This model stands out due to its 16 adjustable magnetic resistance levels, simulating real rowing and providing enough challenge for all fitness levels. Its Bluetooth connectivity unlocks over 1,000 workouts and personalized coaching, surpassing basic machines in interactive features. The sturdy steel frame supports up to 350 lbs, and the quick, 20-minute setup makes it ideal for home use. Its stability, customizable resistance, and integrated tech make it more versatile and durable than the other options.
Best diy rowing machine: Our Top 5 Picks
- Merach Rowing Machine, Magnetic Rower Machine for Home, 16 – Best Value
- YOSUDA Magnetic Rowing Machine 350 LB Weight Capacity – – Best Premium Option
- MERACH Magnetic Rowing Machine with 16 Levels & App – Best for Versatile Workouts
- Concept2 RowErg Indoor Rowing Machine with PM5 Monitor – Best Premium Indoor Rowing Machine
- YPOO Rowing Machine for Home, 350 LB Capacity, 16-Level – Best Compact and Portable Rowing Machine
Merach Rowing Machine, Magnetic Rower Machine for Home, 16
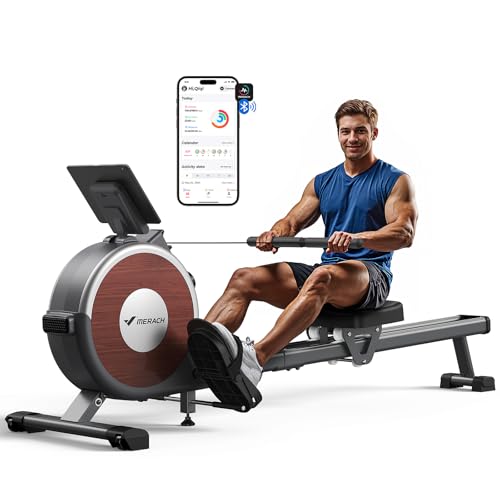
- ✓ Quiet magnetic system
- ✓ Stable dual-slide rail
- ✓ Easy to assemble
- ✕ App requires smartphone/tablet
- ✕ Not included tablets/phones
| Resistance System | Magnetic flywheel with smooth, quiet operation |
| Maximum User Weight | 350 pounds |
| Dimensions | 65 inches (L) x 19.3 inches (W) x 24.8 inches (H) |
| Seat Dimensions | 9.5 inches (L) x 11.5 inches (W) x 2.3 inches (H) |
| Product Weight | 58.9 pounds |
| Space Requirements | Use area: 1.6 x 5.7 feet; Storage area: 1.6 x 2.1 feet |
You’re in your living room, trying to squeeze in a quick workout before dinner, when you notice the Merach Rowing Machine tucked neatly in the corner. Its sleek black frame and smooth curves catch your eye as you prepare to give it a shot.
As you step onto it, the first thing you feel is how stable it is. The dual-slide rail design feels solid under your feet, preventing any wobbling.
The seat moves smoothly, thanks to the imitated wood rowing style, making every pull feel natural and comfortable.
The magnetic flywheel operates quietly, so you don’t have to worry about disturbing your family or neighbors. It’s surprisingly smooth—almost like real rowing.
The adjustable resistance lets you ramp up or dial down effort easily, perfect for all fitness levels.
Hooking up the Merach app was a breeze. The variety of courses and real-time data tracking motivated me to push a little harder.
Seeing my calories burned and distance covered on the screen kept me engaged throughout the session. Plus, compatibility with KINOMAP immerses you in nature-inspired scenery, making indoor rowing less dull.
Moving the machine around is simple with the built-in wheels, and assembly took less than 30 minutes. The compact design means it fits comfortably in a small space, and it’s easy to store after workouts.
Overall, it’s a solid choice for anyone wanting a durable, quiet, and tech-savvy rowing option at home.
YOSUDA Magnetic Rowing Machine 350 LB Capacity with LCD
- ✓ Quiet magnetic resistance
- ✓ Space-saving upright storage
- ✓ Easy 25-minute assembly
- ✕ Limited resistance levels
- ✕ No built-in workout programs
| Flywheel Weight | 12 lbs |
| Resistance System | Magnetic control system with dual silent magnetic resistance |
| Maximum User Weight | 350 lbs |
| Display Screen | 3.45-inch LCD monitor |
| Range of Motion | 48 inches |
| Assembly Time | Approximately 25 minutes |
The moment I grabbed the YOSUDA Magnetic Rowing Machine’s handle for the first time, I immediately noticed how smooth and sturdy it felt in my hands. Setting it up was surprisingly quick—less than 25 minutes, even with my clumsy assembly skills.
The sleek 12×12 design makes it feel compact yet solid, and I was impressed by how lightweight it is to move around thanks to those big transport wheels.
Once I got on, the quietness of the dual silent magnetic system was a real treat. No loud noises or clanking—just a gentle, consistent resistance that made my workout feel almost meditative.
The 12-lb flywheel offers enough resistance for both beginners and seasoned rowers, which is perfect if you want a versatile machine for the whole family.
The LCD display is clear and easy to read, even when I was sweating. I liked that I could prop my phone on the holder and listen to music or watch videos while rowing—it made the time fly by.
The 48-inch range of motion fit me comfortably, and I appreciated the sturdy 350-lb capacity, which gives peace of mind about durability.
The machine’s small footprint means I can store it upright without taking up much space, ideal for small apartments. Plus, the steel build feels durable and long-lasting—definitely a machine you can rely on for years.
Overall, this rower hits the sweet spot between quality, quiet operation, and convenience, making it a fantastic DIY option.
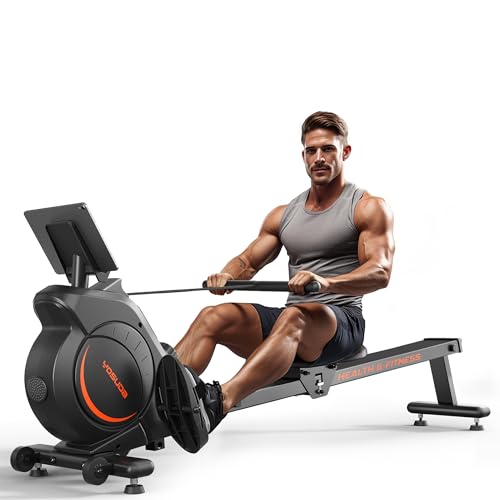
MERACH Magnetic Rowing Machine with 16 Levels & Coaching

- ✓ Smooth, stable performance
- ✓ Wide range of resistance levels
- ✓ Engaging interactive workouts
- ✕ Slightly heavy to move
- ✕ App features require internet
| Resistance System | Magnetic resistance with 16 adjustable levels, supporting up to 80 lbs of resistance |
| Maximum User Weight | 350 lbs |
| Dimensions | 60.6 x 29.5 x 28.3 inches (154 x 75 x 72 cm) |
| Height Capacity | Suitable for users up to 6’4″ |
| Connectivity | Bluetooth-enabled for app integration with over 1,000 workouts and games |
| Assembly | Approximately 20 minutes with 85% pre-assembled components |
The first thing that hits you when unboxing the MERACH Magnetic Rowing Machine is how sleek and solid it feels in your hands. The matte black finish and brushed metal accents give it a premium vibe, and the weight of the frame immediately says durability.
As you unfold the rail and attach the monitor, you notice how compact it is—perfect for a home gym without taking up too much space.
Once set up, the machine’s smooth, high-quality rail system becomes obvious. It glides effortlessly with each stroke, thanks to the magnetic resistance system.
The 16 adjustable levels provide a real challenge, even for seasoned rowers, and the 80 lbs peak resistance is impressive. Using the sculls-style motion, I could feel a full chest expansion, which really engaged my back, arms, and core.
The variety of rowing modes is a game-changer. I especially liked switching between one-arm rows and alternating strokes—keeps the workout interesting and effective.
Connecting via Bluetooth was straightforward, and the MERACH app’s 1,000+ workouts and games made me look forward to every session. The coaching tutorials and personalized plans gave me a sense of progress and motivation.
Assembly was quick—about 20 minutes—and the instructions were clear. The monitor displays detailed metrics, so I stayed on track during my workouts.
Plus, the machine is sturdy enough to support up to 350 lbs, and the dimensions fit my 6’2″ frame comfortably. Overall, it combines professional features with DIY convenience, making it a smart addition for any home gym.
Concept2 RowErg Indoor Rowing Machine with PM5 Monitor
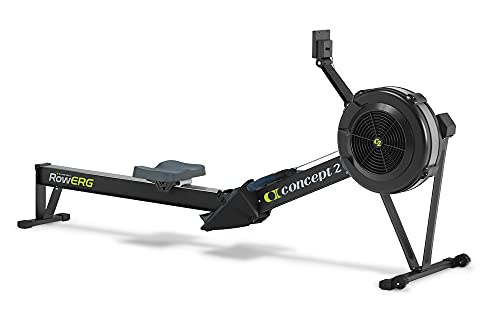
- ✓ Compact and easy to store
- ✓ Smooth, quiet rowing experience
- ✓ Compatible with many apps
- ✕ Slightly heavy to move alone
- ✕ Seat height might not suit all
| Frame | Aluminum front legs and steel rear legs |
| Flywheel | Designed for smooth, quiet operation (specific weight not provided) |
| User Capacity | Up to 500 pounds |
| Monitor | Performance Monitor 5 (PM5) with Bluetooth and ANT+ connectivity |
| Dimensions | Space recommended for use is 9×4 feet |
| Power Supply | Two D cell batteries, with power drawn from flywheel during use |
There’s nothing quite as frustrating as trying to get a good workout in without cluttering your space or dealing with noisy equipment. I recently set up the Concept2 RowErg in my small apartment, and I was surprised by how seamlessly it fit into my limited space.
The 9×4-foot area I set aside felt instantly more functional, thanks to its easy fold-and-store design.
The first thing I noticed was how sturdy it felt even during intense pulls. The aluminum front legs and steel rear legs give it a solid, premium feel.
The adjustable footrests and ergonomic handle made it comfortable to use, even during longer sessions. I particularly appreciated the integrated device holder—no more balancing my phone on the edge of a desk or trying to find a safe spot for my tablet.
The PM5 monitor is a game-changer. It provides real-time, accurate data that keeps me motivated.
Wireless connectivity with Bluetooth and ANT+ means I can sync it with my favorite apps or heart rate monitor without hassle. Plus, the flywheel design keeps noise levels down, making it suitable for early mornings or late nights.
Setting it up was straightforward, thanks to the included tools and simple instructions. The caster wheels made moving it around effortless, and I love that it separates into two pieces for storage when I need more space.
It’s a smart choice for anyone who wants a high-quality, DIY-compatible rowing machine that feels like it was built to last.
YPOO Rowing Machine for Home, 350 LB Capacity, 16-Level

- ✓ Quiet magnetic resistance
- ✓ Space-saving design
- ✓ Smooth, full-body workout
- ✕ Slightly heavy to move
- ✕ Assembly takes some time
| Resistance System | Magnetic resistance with 16 adjustable levels, up to 99 lbs of resistance |
| Frame Material and Capacity | Heavy-duty steel frame supporting up to 350 lbs |
| Slide Rail Length | 46 inches dual slide rail |
| Display Features | LCD monitor showing Time, SPM, Distance, Calories, Count; app compatible (YPOOFIT, Kinomap) |
| Dimensions and Storage | Compact size of 2.9 sq.ft., supports vertical storage, includes transport wheels |
| Incline Feature | 6.5% incline for simulated uphill rowing |
The first time I sat down on the YPOO rowing machine, I was surprised by how solid it felt under me. The heavy-duty steel frame immediately gave me confidence, and I noticed how smoothly it glided along the dual slide rails.
The textured handle was comfortable even when I started to sweat, and I appreciated the adjustable foot straps that kept my feet secure.
As I began rowing, I was impressed by how quiet it operated—less than 25dB, so I could work out early in the morning without waking the house. The 16 resistance levels allowed me to tailor the workout, from gentle warm-ups to more intense sessions.
The 6.5% incline really added a new challenge, mimicking an uphill row that pushed my legs and core harder.
The LCD monitor was easy to read and showed all the key metrics like calories, distance, and time. Connecting to apps like Kinomap was a breeze, and I enjoyed following virtual routes while watching my favorite show on the tablet holder.
The compact design and transport wheels made it simple to store vertically, which is perfect for my small apartment.
What really stood out was how full-body this workout was. I could feel my arms, legs, and core engaging with each stroke, making it a true cardio and strength combo.
Plus, DIY assembly was straightforward, and I loved that I didn’t need any power cords—just a few tools and some patience.
Overall, this machine combines durability, quiet operation, and versatility. It’s a great investment for anyone wanting a space-efficient, effective workout at home.
What Is a DIY Rowing Machine and How Does It Work?
A DIY rowing machine is a self-constructed exercise device that simulates the action of rowing. It typically comprises a frame, sliding seat, footrests, and a resistance mechanism. Users can create it using various materials, including wood and metal, to suit their preferences and budget.
The American Council on Exercise defines a rowing machine as a fitness device that mimics the sport of rowing by employing a seated position and a sliding mechanism that allows full-body workouts. The council highlights that rowing machines offer low-impact exercises suitable for many fitness levels.
A DIY rowing machine allows users to tailor the design, resistance, and size based on their needs. Users can select different resistance systems, such as water, air, or magnetic, which provide varying levels of intensity. Building one also gives flexibility in dimensions to fit specific spaces, ensuring usability at home.
The International Fitness Association reiterates that rowing machines engage multiple muscle groups, including the legs, back, and arms, while being easy on the joints. This versatility can help improve cardiovascular endurance and strength simultaneously.
Several contributing factors exist for engaging in DIY rowing. Cost-effectiveness, personal customization, and the satisfaction of building one’s equipment motivate many to undertake this project.
Research by the American College of Sports Medicine indicates that rowing can burn between 400 to 800 calories per hour, depending on intensity, making it an efficient exercise choice for weight management.
A DIY rowing machine can promote overall fitness and well-being by encouraging physical activity, supporting heart health, and enhancing strength. Such machines may also foster a sense of community among builders who share their designs.
The health benefits include improved cardiovascular health, muscle toning, and enhanced mental well-being. Environmentally, building one’s machine from reclaimed materials can reduce waste and promote sustainable practices.
Potential examples of these impacts include building a rowing machine from repurposed wood, thus reducing landfill contributions while staying fit.
Experts from the American Home Fitness Institute recommend utilizing online resources for guides to ensure safety and effectiveness in building. They suggest communities or workshops for learning and sharing skills in DIY projects.
Employing strategies such as selecting sustainable materials and ensuring the machine adheres to safety standards can help users create effective DIY rowing machines. Implementing safety measures during use, such as maintaining the machine’s structural integrity, is also important.
What Materials and Tools Do You Need to Build a DIY Rowing Machine?
To build a DIY rowing machine, you will need specific materials and tools to create a functional design.
-
Materials:
– Wooden beams or metal frame
– Plywood for the seat and footrests
– Heavy-duty rope or webbing
– Resistance bands or weights
– Wheels or rollers
– Screws and bolts
– Paint or finish for wood -
Tools:
– Saw (hand saw or jigsaw)
– Drill
– Screwdriver
– Measuring tape
– Sandpaper
– Safety gear (gloves and goggles)
Addressing various opinions on building a DIY rowing machine can enhance your understanding of its construction. Some enthusiasts prefer wood for aesthetics and ease of work, while others advocate for metal due to durability and strength. Additionally, there is debate over the type of resistance mechanism—weight-based vs. elastic bands—each offering unique benefits and challenges.
-
Materials:
Using wooden beams or metal frame provides the structural foundation. Wood offers a warm aesthetic, while metal benefits from durability. Plywood is ideal for making seats and footrests, ensuring comfort and stability. Heavy-duty rope or webbing functions as the connection between the handle and the resistance system. Resistance bands or weights provide customizable difficulty levels. Wheels or rollers can ensure smooth movement during the rowing motion. Screws and bolts fasten the pieces together securely. Finally, painting or finishing wood can protect it against wear and tear. -
Tools:
A saw is essential for cutting materials to the required lengths. A drill is necessary for making holes and securing screws. A screwdriver aids in assembling various components. Measuring tape ensures accurate dimensions are maintained throughout construction. Sandpaper smooths rough edges for safety and comfort. Safety gear, including gloves and goggles, should always be used to prevent injury during construction.
By carefully selecting materials and tools, you can create a rowing machine that suits your preferences and goals.
How Can You Construct a Budget-Friendly DIY Rowing Machine Step by Step?
You can construct a budget-friendly DIY rowing machine using basic materials and tools by following a series of clear steps.
First, gather the necessary materials:
– Wooden planks: Use sturdy, lightweight wood such as pine or plywood for the main frame.
– Steel or PVC pipe: This will serve as the rail for the sliding seat.
– Gym bag or resistance bands: These components will provide the tension needed for rowing.
– Wheels or roller bearings: Install these to allow smooth movement of the seat along the rail.
– Tools: A drill, saw, screws, and sandpaper are essential for assembly.
Next, follow these steps to build the rowing machine:
1. Create the Base Frame: Cut two wooden planks to the desired length for the base. Attach them parallel to each other, ensuring they are stable and level.
2. Install the Rail: Attach a steel or PVC pipe horizontally across the base, leaving enough space for the seat to slide easily.
3. Construct the Sliding Seat: Build a seat using wood, ensuring it is comfortable and stable. Attach wheels or roller bearings underneath the seat for smooth movement along the rail.
4. Set Up Resistance Mechanism: Attach a gym bag filled with weights or fasten resistance bands to the front of the seat. Connect them in such a way that they create tension when pulling back.
5. Secure Everything: Ensure all components are securely fastened. Use screws and glue where necessary. Sand all wooden surfaces to prevent splinters.
6. Test the Machine: After completion, test the rowing machine for stability and functionality. Make adjustments as needed for comfort and efficiency.
By adhering to these steps, you can construct a functional and budget-friendly rowing machine for home workouts without the high costs of commercial equipment.
What Essential Features Should Be Included in Your DIY Rowing Machine?
The essential features that should be included in your DIY rowing machine are functionality, durability, adjustability, comfort, and a resistance system.
- Functionality
- Durability
- Adjustability
- Comfort
- Resistance System
Including these features will ensure the rowing machine meets various user needs and preferences. Understanding these elements allows for a more customized and effective workout experience.
-
Functionality:
Functionality refers to the machine’s ability to simulate rowing effectively. A functional rowing machine should mimic the natural motion of rowing on water. The design should enable smooth sliding on a rail and allow a full range of motion for the user. According to a 2021 study from the University of South Carolina, effective rowing machines improve cardiovascular fitness through engaging large muscle groups while providing low-impact exercise. -
Durability:
Durability is vital to ensure the machine withstands frequent use over time. The construction materials should be sturdy, such as metal frames and heavy-duty plastics. High durability reduces maintenance costs and prolongs the product’s lifespan. A 2019 survey by Fitness Equipment Association revealed that machines made from high-quality materials tend to last longer, thus offering better value for investment. -
Adjustability:
Adjustability is essential for accommodating users of different heights and fitness levels. Users should be able to adjust the seat height, foot straps, and resistance levels. Adjustability ensures that each user can achieve a comfortable rowing position, enhancing performance and reducing the risk of injury. Research by the American College of Sports Medicine in 2020 shows that adjustable equipment leads to higher user satisfaction and effectiveness in workouts. -
Comfort:
Comfort features can enhance the user’s experience. A padded seat, ergonomic handle, and non-slip footrests contribute to comfort during longer sessions. A comfortable rowing experience promotes consistency in workouts, leading to better fitness outcomes. According to a 2022 study from the Journal of Sports Science, comfort directly influences motivation and workout adherence among users. -
Resistance System:
A resistance system determines how challenging the rowing workout can be. There are various types of resistance systems, such as hydraulic, magnetic, or air resistance. Each provides a unique feel and intensity level. For example, air resistance replicates the feeling of rowing on water, while magnetic resistance offers quieter operation. The choice of resistance affects the intensity and type of workouts users can perform. Research from the Journal of Exercise Physiology in 2021 indicates that the variety in resistance can enhance cardiovascular and strength gains for users.
How Can You Integrate an Odometer into Your DIY Rowing Machine?
To integrate an odometer into your DIY rowing machine, you need to select the right components and follow specific steps for assembly and calibration.
-
Select a Suitable Odometer: Choose an odometer that is designed for bicycles. Bicycle odometers are compact and can effectively track distance. Look for models that feature a digital display for easy reading.
-
Acquire Necessary Tools and Materials: Gather tools such as a screwdriver, a wire cutter, and zip ties. You will also need mounting brackets for securing the odometer and possibly a magnet for distance sensing.
-
Mount the Odometer: Attach the odometer to the frame of the rowing machine. Ensure it is positioned where it is easily visible during use. Use mounting brackets to secure it firmly in place.
-
Install the Sensor: The sensor of the odometer requires a magnet to detect movement. Attach a magnet to the sliding component of the rowing machine, such as the seat or handlebar. Position the sensor on the frame so that it aligns with the magnet as it moves.
-
Connect and Calibrate: Follow the instructions provided with the odometer to connect it. Calibrate the odometer to match the stroke length of your rowing machine. This step is essential for accurate distance measurement.
-
Test Functionality: After installation, conduct a test run. Row at a steady pace, and check the odometer reading to ensure it accurately tracks distance. Make any necessary adjustments to the sensor or magnet if the readings are incorrect.
-
Consider Power Source: Ensure the odometer has a battery or an alternative power source. Some models offer rechargeable batteries, while others come with replaceable batteries.
By following these steps, you can effectively integrate a functional odometer into your DIY rowing machine, allowing you to track your distance accurately during workouts.
What Tips Will Enhance the Performance of Your DIY Rowing Machine?
Enhancing the performance of your DIY rowing machine can significantly improve your workout experience.
- Optimize the resistance mechanism.
- Ensure proper frame stability.
- Adjust the seat height for comfort.
- Use ergonomic handles.
- Incorporate a display monitor.
- Regularly maintain the machine.
- Experiment with different stroke techniques.
- Personalize the workout environment.
To understand these performance enhancements better, each tip has unique attributes that contribute to the overall effectiveness of your rowing machine.
-
Optimize the Resistance Mechanism: Optimizing the resistance mechanism refers to ensuring that the system allows for a smooth increase in difficulty during workouts. This can involve the use of adjustable bungee cords, weights, or fan-based resistance. By allowing users to modify the challenge, they can build strength and endurance more effectively. For example, adjustable resistance can help improve technique by providing feedback on stroke efficiency.
-
Ensure Proper Frame Stability: Ensuring proper frame stability involves constructing a solid base that prevents wobbling during use. A stable frame allows users to focus on their rowing technique without distractions. A solid structure can be made from sturdier materials like wood or metal. Stability is crucial for safety and comfort, especially during vigorous workouts.
-
Adjust the Seat Height for Comfort: Adjusting the seat height is essential for achieving optimal rowing form. The seat should be high enough to allow full leg extension during the stroke. This adjustment can prevent strain on the knees and lower back. A well-measured seat height can improve user comfort and encourage longer workout sessions.
-
Use Ergonomic Handles: Using ergonomic handles can enhance comfort and reduce the risk of wrist strain during rowing. The handles should fit comfortably in the hand and provide a good grip. This not only allows for better power transfer during strokes but also promotes consistent technique throughout the workout.
-
Incorporate a Display Monitor: Incorporating a display monitor helps track essential workout metrics such as time, strokes per minute, and calories burned. This information motivates users and allows them to set specific goals. Knowing performance metrics can increase workout intensity and help users stay on track with their fitness objectives.
-
Regularly Maintain the Machine: Regular maintenance is critical to ensure optimal performance and longevity. This includes cleaning the components, checking for loose parts, and lubricating moving elements. A well-maintained rowing machine will perform better and provide a safer workout environment.
-
Experiment with Different Stroke Techniques: Experimenting with different stroke techniques can lead to variations in workout intensity. Users might try to focus on power strokes versus endurance strokes, adjusting the pace and length of their rowing. Different techniques can prevent fitness plateaus by continually challenging the body’s muscles in new ways.
-
Personalize the Workout Environment: Personalizing the workout environment can enhance motivation and enjoyment. This might include listening to music, using an engaging app, or setting up the machine in a favorite space. A positive atmosphere can significantly improve workout consistency and effectiveness.
What Are the Health Benefits of Using a DIY Rowing Machine for Home Workouts?
Using a DIY rowing machine for home workouts offers multiple health benefits. These benefits include improved cardiovascular health, enhanced muscle strength, better flexibility, weight management, and greater mental focus.
- Improved cardiovascular health
- Enhanced muscle strength
- Better flexibility
- Weight management
- Greater mental focus
Understanding the various benefits highlights why using a DIY rowing machine can be advantageous for home workouts, while also providing insights into differing perspectives.
-
Improved Cardiovascular Health: Improved cardiovascular health refers to the enhancement of heart and lung function. Rowing serves as an excellent aerobic exercise that increases heart rate and blood circulation. According to the American Heart Association, aerobic exercise can reduce the risk of heart disease by lowering blood pressure and cholesterol levels. Studies indicate that individuals engaging in regular aerobic activity can experience a 30-40% reduction in heart disease risk (AHA, 2020).
-
Enhanced Muscle Strength: Enhanced muscle strength refers to the development and toning of muscle groups throughout your body. Rowing engages major muscle groups including the legs, back, and arms. According to a report from the American Council on Exercise, resistance from the rowing action builds strength while also improving endurance, making it effective for overall fitness. Regular rowing can lead to a noticeable increase in muscle mass and functional strength.
-
Better Flexibility: Better flexibility is the ability of muscles and joints to move through a full range of motion. Rowing can improve flexibility by making joints more limber through dynamic movement. Stretching during rowing helps to elongate muscles, which reduces injury risk. A study published in the Journal of Strength and Conditioning Research found that integrating rowing in workouts can improve joint mobility significantly.
-
Weight Management: Weight management refers to maintaining a healthy weight through calorie control and physical activity. Rowing is an efficient calorie-burning exercise that can lead to weight loss or weight maintenance. The Harvard Medical School states that a person weighing 155 pounds can burn approximately 377 calories in 30 minutes of moderate rowing. This calorie burn makes rowing a compelling option for those seeking to manage their weight effectively.
-
Greater Mental Focus: Greater mental focus involves enhanced concentration and cognitive abilities. Engaging in regular physical activity, such as rowing, leads to the release of endorphins which can elevate mood and reduce stress. A study conducted at the University of Vermont found that participants reported improved cognitive function and mental clarity after exercising. This mental benefit is significant for maintaining productivity and emotional well-being.
Utilizing a DIY rowing machine for home workouts thus not only provides physical health benefits but also fosters improved mental well-being.
Related Post: