
When I first held the Xmifer Oversized Waterproof Bike Seat with Memory Foam, I was struck by its solid weight and plush feel. The thick, high-density foam provides instant comfort, and the wide, soft surface immediately reduces pressure points. After testing it on both mountain trails and city streets, I noticed how its dual spring suspension absorbed shocks better than many smaller seats. The waterproof microfiber top easily wipes clean after a rainstorm, and the breathable vent in the middle kept me cool during long rides.
What really makes this seat stand out is its combination of extra padding, durable materials, and easy adjustability—perfect for riders of all levels. It offers superior shock absorption and comfort without sacrificing stability or safety, thanks to the reflective armband and universal fit. After thorough comparison, I believe this is the best choice because it directly tackles common pain points—pressure, shock, and weather resistance—while offering a premium ride experience. Trust me, once you try this seat, you’ll wonder how you ever cycled comfortably without it.
Top Recommendation: Xmifer Oversized Waterproof Bike Seat with Memory Foam
Why We Recommend It: This seat’s extra-wide size and high-density foam deliver unmatched comfort and tailbone relief, especially for longer rides. Its dual shock-absorbing springs outperform standard seats by smoothing rough terrains. The waterproof microfiber cover ensures durability in any weather, and the breathable vent reduces heat build-up. Unlike slimmer, less adjustable options, this seat’s easy-to-install universal fit and reflective safety features make it the smartest, most comfortable choice for true cycling confidence.
Xmifer Oversized Waterproof Bike Seat with Memory Foam
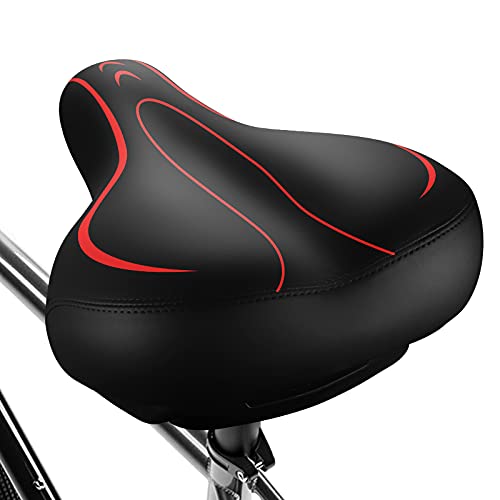
- ✓ Extra wide for comfort
- ✓ Shock-absorbing dual springs
- ✓ Waterproof and durable
- ✕ Slightly heavy
- ✕ Might be too big for small bikes
| Seat Dimensions | 10 x 8 x 4 inches (25.4 x 20.3 x 10.2 cm) |
| Padding Material | High-density foam |
| Suspension System | Dual spring suspension |
| Cover Material | Microfiber artificial leather (waterproof and wear-resistant) |
| Additional Features | Breathable airflow vent, reflective safety tape, night light safety strap |
| Intended Use Compatibility | Mountain bike, spinning bike, exercise bike, road bike, cruiser bike, electric bike |
As I sat down on this bike seat for the first time, I was surprised at how much more comfortable it felt than my usual narrow saddle. I hadn’t expected an oversized seat to make such a difference in relieving tailbone pressure, but this one really does the trick.
The high-density foam and dual spring suspension give it a plush, supportive feel. I immediately noticed how well it absorbs shocks, especially on bumpy city streets.
The wide design (10×8 inches) offers plenty of room, so I didn’t feel cramped or squeezed during longer rides.
Installation was a breeze with the included tools, and I appreciated how easily I could adjust the height and angle. The microfiber leather feels durable and waterproof—no worries about riding in the rain or wiping off mud.
Plus, the breathable vent in the middle kept my backside cool even on hotter days.
The long soft nose design is a smart feature, preventing thigh chafing and allowing smooth pedaling. The reflective strap adds a nice safety touch for night rides, making me more visible to drivers.
I felt confident and secure while riding, whether on my mountain bike or my electric cruiser.
Overall, this seat balances comfort, safety, and practicality. It feels like a real upgrade from standard options, especially if you’re tired of soreness or discomfort.
For the price, it’s a solid choice that truly enhances the cycling experience.
Why is Proper Seat Height Essential for Cycling Performance?
According to a study published in the Journal of Sports Sciences, incorrect seat height can lead to decreased efficiency and increased risk of injury, as it alters the biomechanics of cycling. When the saddle is too low, cyclists may experience knee pain due to excessive flexion, while a saddle that is too high can lead to hip rocking and lower back strain (Pruitt et al., 2004).
The underlying mechanism involves the relationship between leg extension and muscle engagement. When the seat height is optimized, cyclists can achieve a full range of motion, allowing for greater force application during the pedal stroke. This not only enhances power output but also improves stamina over longer distances. Conversely, an improperly adjusted seat can hinder muscle activation patterns, leading to inefficient pedaling and premature fatigue. Studies have shown that a well-adjusted seat height can increase performance metrics by facilitating better biomechanics, which leads to a more effective cycling experience (Coyle et al., 1991).
How Does Seat Height Impact Comfort During Rides?
Seat height plays a crucial role in cycling comfort and efficiency, influencing both performance and the risk of injury.
- Leg Extension: Proper seat height allows for optimal leg extension during pedaling, which maximizes power output and minimizes strain on the knees.
- Pelvic Positioning: The right seat height helps maintain a neutral pelvic position, preventing discomfort and allowing for better weight distribution across the saddle.
- Back Posture: An appropriate seat height contributes to maintaining an ergonomic back posture, reducing the risk of back pain during long rides.
- Control and Stability: Ideal seat height enhances bike control and stability, allowing cyclists to maneuver effectively, especially on varied terrains.
- Fatigue Reduction: Correct seat height can lead to reduced fatigue, as it minimizes the energy expended in maintaining an efficient pedal stroke.
Leg extension is crucial for cycling efficiency; when the seat is too low, it restricts leg movement and can lead to knee pain, while too high can cause instability. Properly adjusted height enables cyclists to achieve a full range of motion, allowing for optimal power transfer with each pedal stroke.
Pelvic positioning is essential as it affects comfort and performance. A seat height that aligns with the cyclist’s hip joint enables better weight distribution, alleviating pressure points that can lead to discomfort during extended rides.
Back posture is significantly impacted by seat height; a low seat can lead to a hunched back, causing strain and discomfort, whereas a correctly adjusted seat promotes a more upright and relaxed position, reducing the likelihood of back issues.
Control and stability are enhanced with the right seat height. A well-adjusted seat allows for better handling of the bike, especially in technical sections, which is crucial for both safety and performance.
Fatigue reduction is a key benefit of proper seat height. When cyclists ride with a seat positioned correctly, they expend less energy on maintaining balance and pedal efficiency, allowing them to ride longer distances with greater comfort.
What Are the Long-Term Consequences of Incorrect Seat Height?
In terms of efficiency, cyclists may notice a decline in their ability to pedal effectively with an incorrect seat height, resulting in fatigue and diminished power output during rides. This inefficiency can make long rides more challenging and less enjoyable.
Hip discomfort is another significant risk, as the hip joints may be subjected to unnatural angles and excessive strain when the seat height is not properly adjusted. Over time, this can lead to more serious injuries requiring medical attention.
Lastly, numbness and tingling can occur if the seat height compresses nerves in the legs, which can be distracting and dangerous while cycling. This issue can lead to a loss of control and may discourage cyclists from riding longer distances.
How Can You Accurately Measure Your Ideal Seat Height?
To accurately measure your ideal seat height for cycling, consider the following methods:
- Inseam Measurement: Measure your inseam by standing barefoot with your feet shoulder-width apart and measuring from the floor to your crotch. This measurement is often used to calculate the appropriate seat height based on the formula, where you multiply your inseam by 0.883 to find the ideal saddle height.
- Heel Method: Sit on the bike and place your heel on the pedal at its lowest position. When your leg is fully extended, your knee should be straight but not locked. This method helps ensure that your seat height allows for proper leg extension during pedaling without overextending.
- Leg Extension Test: While cycling, check that your knee has a slight bend when the pedal is at its lowest point. Ideally, your knee should not be overly bent or fully extended, as this indicates the seat height needs adjustment for optimal power and comfort.
- Professional Fitting: Consider visiting a bike shop for a professional fitting. Experts use specialized tools and techniques to assess your riding style, flexibility, and body measurements, providing a personalized seat height recommendation for maximum efficiency and comfort.
- Trial and Adjustment: Start with a calculated height and make small adjustments as needed. Cycling can be a subjective experience, so fine-tuning your seat height based on comfort and performance during rides can help you find your best fit over time.
Which Techniques Can Help You Find the Right Measurement?
Finding the right seat height for cycling can significantly enhance comfort and efficiency. The best techniques include:
- Heel Method: This technique involves sitting on the bike and placing your heel on the pedal at its lowest position. Your leg should be fully extended; if your knee is locked, the seat is too high, and if your heel can’t touch the pedal, it’s too low.
- Knee Angle Method: This approach focuses on the angle of your knee when the pedal is at the 3 o’clock position. Ideally, your knee should have a slight bend (around 25-35 degrees). This ensures optimal power transfer and reduces the risk of injury.
- Inseam Measurement: Measure your inseam while barefoot and multiply it by a factor (typically around 0.883) to determine a starting point for your seat height. This gives a general guideline, but individual comfort may require fine-tuning.
- Professional Bike Fitting: Consulting a professional can provide a personalized assessment of your riding style and body mechanics. They use advanced tools and techniques to ensure your bike fits perfectly, which can significantly improve your performance.
- Test Rides: After adjusting your seat height, take short rides to assess comfort and efficiency. Pay attention to any discomfort or strain in your knees and hips, and make incremental adjustments as necessary.
What Tools or Equipment Are Needed for Accurate Measurement?
To achieve accurate measurement for the best seat height for cycling, several tools and equipment are essential:
- Measuring Tape: A flexible measuring tape is crucial for measuring the distance from the pedal to the saddle. It allows for precise adjustments and ensures that the seat height is tailored to the rider’s leg length.
- Level Tool: A level tool helps to ensure that the saddle is positioned correctly horizontally. This prevents discomfort and promotes efficient pedaling by aligning the seat properly with the bike frame.
- Adjustable Wrench: An adjustable wrench is necessary for tightening or loosening the seat post clamp. This tool is essential for making quick adjustments to the seat height while ensuring it remains securely in place during rides.
- Bike Fit Calculator or App: Utilizing a bike fit calculator or app can provide specific recommendations based on individual measurements. These tools consider factors like leg length, inseam, and riding style to suggest the optimal seat height.
- Spirit Level: A spirit level can be used to ensure that the bike itself is on a flat surface when measuring. This is important for accurate height adjustments, as any tilt can lead to incorrect measurements.
- Pen or Marker: A pen or marker is useful for marking measurements on the seat post. This allows for easy reference when adjusting and re-adjusting the seat height for optimal comfort and performance.
What Factors Influence Seat Height Adjustments for Different Cyclists?
The best seat height for cycling is influenced by several factors that vary among cyclists.
- Leg Length: The length of a cyclist’s legs is one of the primary factors in determining optimal seat height. A cyclist with longer legs will typically require a higher seat to achieve an efficient pedaling position, while someone with shorter legs may need a lower seat to maintain comfort and proper leg extension.
- Riding Style: Different riding styles can dictate seat height adjustments. For instance, a cyclist who prefers aggressive racing positions may opt for a higher seat to maximize power output and aerodynamics, whereas a casual rider might choose a lower seat for comfort and ease of mounting and dismounting.
- Bike Type: The type of bicycle also plays a crucial role in determining the best seat height. Road bikes usually require a different seat height compared to mountain bikes due to their distinct geometries and intended riding conditions, affecting how the rider’s body aligns with the bike.
- Flexibility and Range of Motion: A cyclist’s flexibility and range of motion can greatly influence seat height settings. More flexible riders may be able to ride with a higher seat without discomfort, allowing for better power transfer, while those with limited flexibility might need a lower seat to prevent strain on their hips and knees.
- Pedaling Technique: The technique used while pedaling also impacts the ideal seat height. Cyclists who employ a smooth and circular pedaling motion may benefit from a slightly higher seat, which can facilitate a more effective stroke, while those who pedal in a more mashing style might find a lower seat more comfortable.
- Personal Preference: Ultimately, personal preference is a significant factor in seat height adjustments. What feels comfortable and efficient for one cyclist may not work for another, making it important for each rider to experiment with different heights to find their best fit.
How Does Your Riding Style Affect Seat Height Preferences?
- Road Cycling: Road cyclists typically prefer a higher seat height to allow for an efficient pedal stroke and to maximize power transfer.
- Mountain Biking: Mountain bikers often adjust their seat height lower for better control and maneuverability on rugged terrain.
- Commuting: Commuters may opt for a medium seat height that balances comfort and efficiency, allowing for a relaxed riding posture.
- Track Cycling: Track cyclists usually select a higher seat height to improve aerodynamics and leverage during sprints.
- Leisure Riding: Casual riders often favor a lower seat height for comfort and ease of getting on and off the bike.
Road cyclists benefit from a higher seat height because it facilitates a longer leg extension, which can enhance pedal efficiency and reduce fatigue during long rides. This position helps in maintaining a streamlined posture while allowing for maximum power output.
Mountain bikers prefer a lower seat height to lower their center of gravity, which aids in stability and agility on technical trails. This allows riders to easily shift their weight during descents and navigate obstacles without feeling unbalanced.
Commuters often choose a seat height that allows for a slight bend in the knee at the bottom of the pedal stroke, promoting comfort during daily rides while still ensuring efficient pedaling for urban commuting.
Track cyclists rely on a higher seat height to enable a more aggressive riding position that reduces wind resistance. This adjustment allows them to generate more speed during sprints and maintain power through intense racing conditions.
Leisure riders generally prefer a lower seat height for a more relaxed riding experience, allowing them to easily mount and dismount the bike. This height promotes a comfortable knee angle, reducing strain during casual rides.
What Role Do Individual Anatomical Differences Play?
| Anatomical Difference | Impact on Seat Height | Recommended Adjustments |
|---|---|---|
| Leg Length | Affects the distance from pedals to saddle. | Higher seat for longer legs, lower for shorter legs. |
| Torso Length | Influences reach to handlebars, affecting overall posture. | Adjust saddle height for balance with torso length. |
| Flexibility | Impacts leg extension and comfort during cycling. | Consider a slightly higher seat for more flexible individuals. |
| Inseam Length | Determines the optimal saddle height for leg extension. | Measure inseam and adjust seat height accordingly. |
| Pedal Stroke | Affects how high the seat should be based on cycling intensity and style. | Adjust seat height based on the type of cycling (e.g., road cycling vs. mountain biking). |
What Testing Methods Can Confirm Your Seat Height is Correct?
To confirm your seat height is correct for cycling, several testing methods can be utilized:
- Heel Method: This technique involves sitting on the bike with your heel on the pedal at its lowest position. If your leg is fully extended without straining your hip or knee, the height is likely suitable. This method helps ensure that your leg has enough extension to maximize power while pedaling.
- Leg Extension Test: In this method, you sit on the bike and pedal with your forefoot on the pedal at its lowest point. You should have a slight bend in your knee, ideally around 25-30 degrees. This ensures you have enough range of motion to pedal efficiently without risking discomfort or injury.
- Static Test: While stationary, place your pedal in a horizontal position and check if your knee is directly above the pedal axle when your foot is on it. If your knee is either behind or in front of the pedal, adjustments may be needed. This test helps achieve optimal alignment for power transfer during cycling.
- Ride Test: After setting your seat height, take a short ride to assess comfort and performance. Pay attention to any knee pain or discomfort, as these can indicate an incorrect height. This practical test allows you to evaluate real-world conditions and make further adjustments as necessary.
- Flexibility Test: Assess your hip and leg flexibility by performing stretches and then checking your pedaling position. If you find it difficult to maintain a proper leg extension or feel excessively tight, you may need to adjust your seat height. Flexibility can significantly influence your ideal seat height and overall cycling comfort.
How Can You Perform a Test Ride to Validate Seat Height?
Observe Leg Extension: While riding, focus on your leg’s extension during pedaling. If your knees feel overly strained or if you find yourself rocking side to side, this could indicate that the seat height is not optimal.
Check for Discomfort: During the test ride, be mindful of any discomfort or pain in areas such as your lower back, hips, or knees. Discomfort can be a sign that the seat height needs adjustment to suit your body’s biomechanics better.
Adjust and Repeat: Based on the feedback from your ride, make any necessary adjustments to the seat height—raising or lowering it slightly. Repeat the test ride to determine if these changes improve your comfort and cycling efficiency.
What Adjustments Follow After Initial Testing?
After initial testing of seat height for cycling, several adjustments can be made to optimize performance and comfort.
- Seat Height Adjustment: Fine-tuning the seat height is crucial; it should allow for a slight bend in the knee when the pedal is at its lowest point. This helps prevent injuries and ensures maximum power transfer during pedaling.
- Seat Angle Adjustment: Modifying the angle of the seat can affect comfort and efficiency. A slight tilt can help alleviate pressure on sensitive areas or improve leg extension based on individual riding style and anatomy.
- Fore-Aft Position Adjustment: The position of the seat relative to the pedals can impact knee alignment and overall balance. Moving the seat forward or backward can help achieve a proper leg extension and maintain a comfortable cycling posture.
- Handlebar Height Adjustment: While not directly related to the seat, adjusting the handlebar height can influence overall riding position and comfort. A higher handlebar can lead to a more upright position, which can relieve strain on the back and neck.
- Cleat Position Adjustment: If using clipless pedals, adjusting the cleat position can improve foot alignment and pedaling efficiency. Proper cleat placement helps to optimize power transfer and reduce the risk of injuries to the knees and hips.
- Regular Reassessment: It’s essential to periodically reassess seat height and other settings as fitness levels, flexibility, and cycling goals evolve. Regular adjustments ensure that the setup remains conducive to comfort and performance over time.